In this tutorial, we will show you how to enable SSL on your website domain from SetupServer.io
First Login to your Setupserver.io Account and then select the server. Now select the application from the dashboard on which you want to enable SSL.
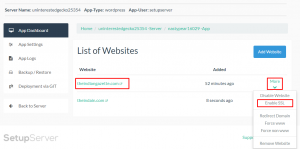
After selecting the desired application you have to choose website domain name to enable your free SSL.
If you have already purchased it and added to the application at the time of creating one, your website name will be displayed in the list.
Now click on “More” button on the left side of your desired website domain to open a drop down list. Select “Enable SSL” and you will be prompted with a modal box for selecting SSL type.
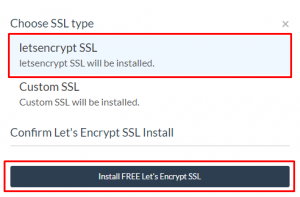
SetupServer.io provides two type of SSL to choose from:
- LetsEncrypt SSL
- Custom SSL
LetsEncrypt SSL
LetsEncrypt SSL will automatically install and configure your SSL certificate in just 1-click and it’s free.
Select LetsEncrypt SSL in modal and click on “Install Free Let’s Encrypt SSL” button below. Now you can relax while SetupServer configures your SSL.
While if you already have configured SSL certificate with you, you can add it with our Custom SSL feature on your desired domain.
Custom SSL
If you are installing your custom SSL certificate you have to provide some of the following information to set it up:
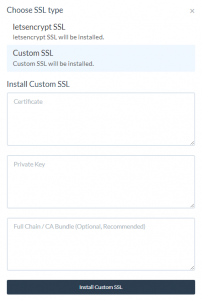
- Certificate – contents of SSL certificate.
- Private Key – private key used to generate SSL certificate.
- Full Chain or CA Bundle – contents of a file containing root and all intermediate certificates. It is optional.
After filling all the desired details click on “Install Custom SSL“.
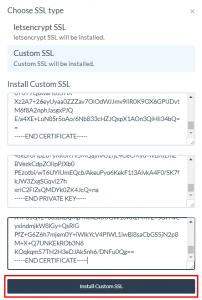
Sit back while we configure your SSL on your domain. After this successful completion, the page will be refreshed and your SSL certificate is now enabled on your domain.
You can check by visiting your website URL by https://YOUR_WEBSITE_DOMAIN_NAME.
Now you can enable HSTS. To know more, see our documentation – Add HSTS to your website